Background
In 2022, if you are not new to NLP (Natural Language Processing), you should have heard of BERT (Bidirectional Encoder Representations from Transforms). It’s a recent language model that was proposed by Google in 2019. By 2020, it was very successful in both beating SOTA for NLP tasks and as well as application on the fields.
Summary
I will walk thru how to train (fine-tune) one of the BERT models, namely the DistilBERT model, to perform sentiment analysis on Amazon Mobile Electronic customer review dataset. The goal is to demonstrate how easy it is to do it with Google Colab and achieve reasonably good results.
Knowledge that will be covered in this tutorial
- Knowledge distillation – I chose to use the distilled version of BERT because it’s a smaller model. This is more accessible for amateur like me who does not have a powerful machine to work on super large model.
- Huggingface – I am using the pre-trained model from HuggingFace which provides very easy to use API in popular frameworks such as Tensorflow and PyTorch
- Basic Keras training API with model.fit
- Tensorflow dataset – I am using the amazon_us_reviews/Mobile_Electronics_v1_00 dataset which is a relatively small dataset to show the power of transfer learning
- Saving a model – serialization
Start by installing/import libraries
First you should install the dependency if it’s not already in your environment
! pip install datasets transformers[sentencepiece]
Next import the library needed for this tutorial
import tensorflow as tf
import tensorflow_datasets as tfds
from tensorflow.keras.optimizers.schedules import PolynomialDecay
from tensorflow.keras.optimizers import Adam

import pandas as pd
import numpy as np
from sklearn.model_selection import train_test_split

from transformers import AutoTokenizer
from transformers import TFAutoModelForSequenceClassification
Check to ensure GPU is available in the environment
num_gpus_available = len(tf.config.experimental.list_physical_devices('GPU'))
print("Num GPUs Available: ", num_gpus_available)
assert num_gpus_available > 0
Data Preparation
Next we load the data from a subset of the Amazon Customer Reviews provided on the Tensorflow Dataset Catalog: https://www.tensorflow.org/datasets/catalog/amazon_us_reviews#amazon_us_reviewsmobile_electronics_v1_00
ds = tfds.load('amazon_us_reviews/Mobile_Electronics_v1_00', split='train', shuffle_files=True)
df = tfds.as_dataframe(ds.take(2000))
We prepare need to prepare the data for training
- Convert the stars to just 2 classes (positive and negative)
- Convert the review text to utf-8 since the model/tokenizer that we will use only expects utf-8
- Extract the feature column which is the review and label column as numpy arrays
df["label"] = df["data/star_rating"].apply(lambda score: 1 if score >= 3 else 0)
df['review'] =df['data/review_body'].str.decode("utf-8")
df = df[["review", "label", ]]

# Get the underlying numpy arrays
reviews = df['review'].values
labels = df['label'].values
Split the dataset into training and validation splits
train_reviews, val_reviews, train_labels, val_labels = train_test_split(reviews, labels, test_size=.3)
Tokenization
We need to separately talk about tokenization because we are using a tokenizer that is coupled with the distilbert-base-uncased model that we are using
checkpoint = "distilbert-base-uncased"
#Assign tokenizer object to the tokenizer class
tokenizer = AutoTokenizer.from_pretrained(checkpoint)
tokenizer([
  'This is a nice phone.',
  'It sucks'],
  truncation=True, padding=True, max_length=128)
We see the output contains ‘input_ids’ and ‘attention_mask’ which are needed for the BERT model.
{
'input_ids': [[101, 2023, 2003, 1037, 3835, 3042, 1012, 102],
              [101, 2009, 19237, 102, 0, 0, 0, 0]],
'attention_mask': [[1, 1, 1, 1, 1, 1, 1, 1],
                   [1, 1, 1, 1, 0, 0, 0, 0]]
}
Next we tokenize both the train and validation splits
def tokenize_dataset(reviews):
    encoded = tokenizer(
        reviews,
        padding=True,
        truncation=True,
        return_tensors='np',
    )
    return encoded.data

# Need to convert to List[str] because the tokenizer expects List but not np.array
tokenized_datasets = {
    "train": tokenize_dataset(train_reviews.tolist()),
    "validation": tokenize_dataset(val_reviews.tolist()),
}
Model Building
Set up the optimizer with some hyperparameters. I did a few trial and errors to come up with them, so by no means they are optimized parameters.
- Use Adam optimizer
- Use learning rate schedule with a linear decay
- Batch size is 8 with the limit GPU in Colab
batch_size = 8
num_epochs = 5
num_train_steps = (len(train_reviews) // batch_size) * num_epochs
# We let the declay goes from 1e-5 to 0 over course of training.
# Feel free to tweak these parameters
lr_scheduler = PolynomialDecay(
    initial_learning_rate=1e-5,
    end_learning_rate=0.,
    decay_steps=num_train_steps
)

# The optimizer is Adam with the learning rate schedule as specified
opt = Adam(learning_rate=lr_scheduler)
Create and compile the model
# Use the pretrained model from the same checkpoint as the tokenizer
# The num_label is 2 because we have a binary classification problem (Positive
# and negative)
model = TFAutoModelForSequenceClassification.from_pretrained(checkpoint, num_labels=2)

# The model return logit (not probability), so we need to make sure to use the
# matching loss function to calculate the Cross Entropy from logits.
loss = tf.keras.losses.SparseCategoricalCrossentropy(from_logits=True)

# Compile the model and monitor the accuracy
model.compile(optimizer=opt, loss=loss, metrics=['accuracy'])
Training
Now we put everything together with the training
history = model.fit(
    tokenized_datasets['train'],
    train_labels,
    validation_data=(tokenized_datasets['validation'], val_labels),
    batch_size=batch_size,
    epochs=num_epochs
)
Next plot the metrics
import matplotlib.pyplot as plt

# summarize history for accuracy
for m in ('accuracy', 'loss'):
  plt.plot(history.history[m])
  plt.plot(history.history['val_'+m])
  plt.title('model '+m)
  plt.ylabel(m)
  plt.xlabel('epoch')
  plt.legend(['Train', 'Validation'], loc='upper left')
  plt.show()
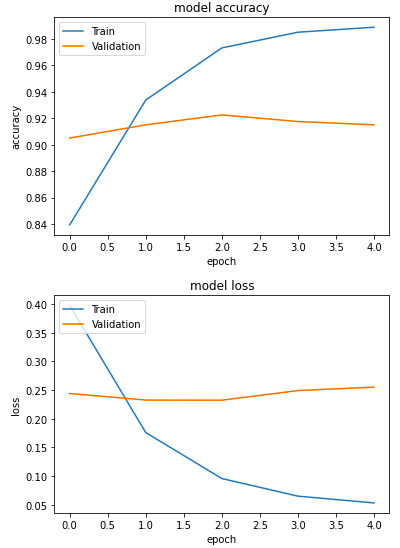
We see that the validation accuracy is already above 90% after the first epoch. Training accuracy keeps going up toward 100% but it’s already overfitting.
Saving the model
We can also save the model in a local directory (you can change it to a mount to a Google Drive directory)
model.save_pretrained("./saved_model")
# load the model back again
loaded_model = TFAutoModelForSequenceClassification.from_pretrained("./saved_model")
Inference
Test raw review strings to see if the model can predict the sentiment correctly
test_reviews = [
                "This is a great phone",
                "The item is dead on arrival",
                "Had to return it because the charging cable was broken"
                "I am not sure if I like this Iphone",
                "I think it's an okay product, but I might not buy again",
]

# it's important to use the same tokenize function to feed to the model
tokenized_inputs = tokenize_dataset(test_reviews)
Let’s call model.predict
tf_output = model.predict(tokenized_inputs)
tf_prediction = tf.nn.softmax(tf_output.logits, axis=1)
labels = ['Negative','Positive']
label = tf.argmax(tf_prediction, axis=1)

for i in range(len(test_reviews)):
  print("Sentense [{}]: {}".format(i, test_reviews[i]))
  print("Probabilities:", tf_prediction[i])
  print("Predition:", labels[label[i]])
  print()
Print the resulting predicted class probabilities and result:
Sentense [0]: This is a great phone
Probabilities: tf.Tensor([0.22118647 0.7788135 ], shape=(2,), dtype=float32)
Predition: Positive

Sentense [1]: The item is dead on arrival
Probabilities: tf.Tensor([0.31097457 0.68902546], shape=(2,), dtype=float32)
Predition: Positive

Sentense [2]: Had to return it because the charging cable was brokenI am not sure if I like this Iphone
Probabilities: tf.Tensor([0.25614288 0.7438571 ], shape=(2,), dtype=float32)
Predition: Positive

Sentense [3]: I think it's an okay product, but I might not buy again
Probabilities: tf.Tensor([0.26244852 0.73755145], shape=(2,), dtype=float32)
Predition: Positive
Summary
That’s all about this tutorial. It is a preliminary example on how to fine tune an pretrained model from Hugging Face and use it for sentiment classification. There are a few more things that I want to try next
- I only did some ad-hoc hyper-parameter tuning by trial and error but I would like to see the maximum performance that can be squeezed from the entire data. One idea is to investigate the impact of training size on the performance.
- Is the label even correct or agreeable? I was reading some the reviews where I felt that the review text sounds positive but the labeled sentiment was negative. More error analysis needs to be conducted.
- Experiment with other pretrained model other than DistillBERT
2 thoughts on “Transformer NLP Tutorial in 2022: Finetune BERT on Amazon Review”